Here you'll find a short tutorial on how to create a campaign using Geeklab's Campaign builder.
At the beginning of creating the campaign, you have the option of manually enter all of the data or to fetch the data from an existing app/game in the app stores. You can also copy an old variant from previous campaign. If you get the data from app stores, you have the option to choose from which country and on what language the data will be fetched. Also, whether you get it from the App Store or from Google Play. (Huawei AppGallery will be available soon.)
We've subdivided the creation process into different modules. Even if you exit the campaign builder before submitting the campaign, all of your changes will be stored.
Behind this link you can find Video guides on setting up the campaign
GENERAL:
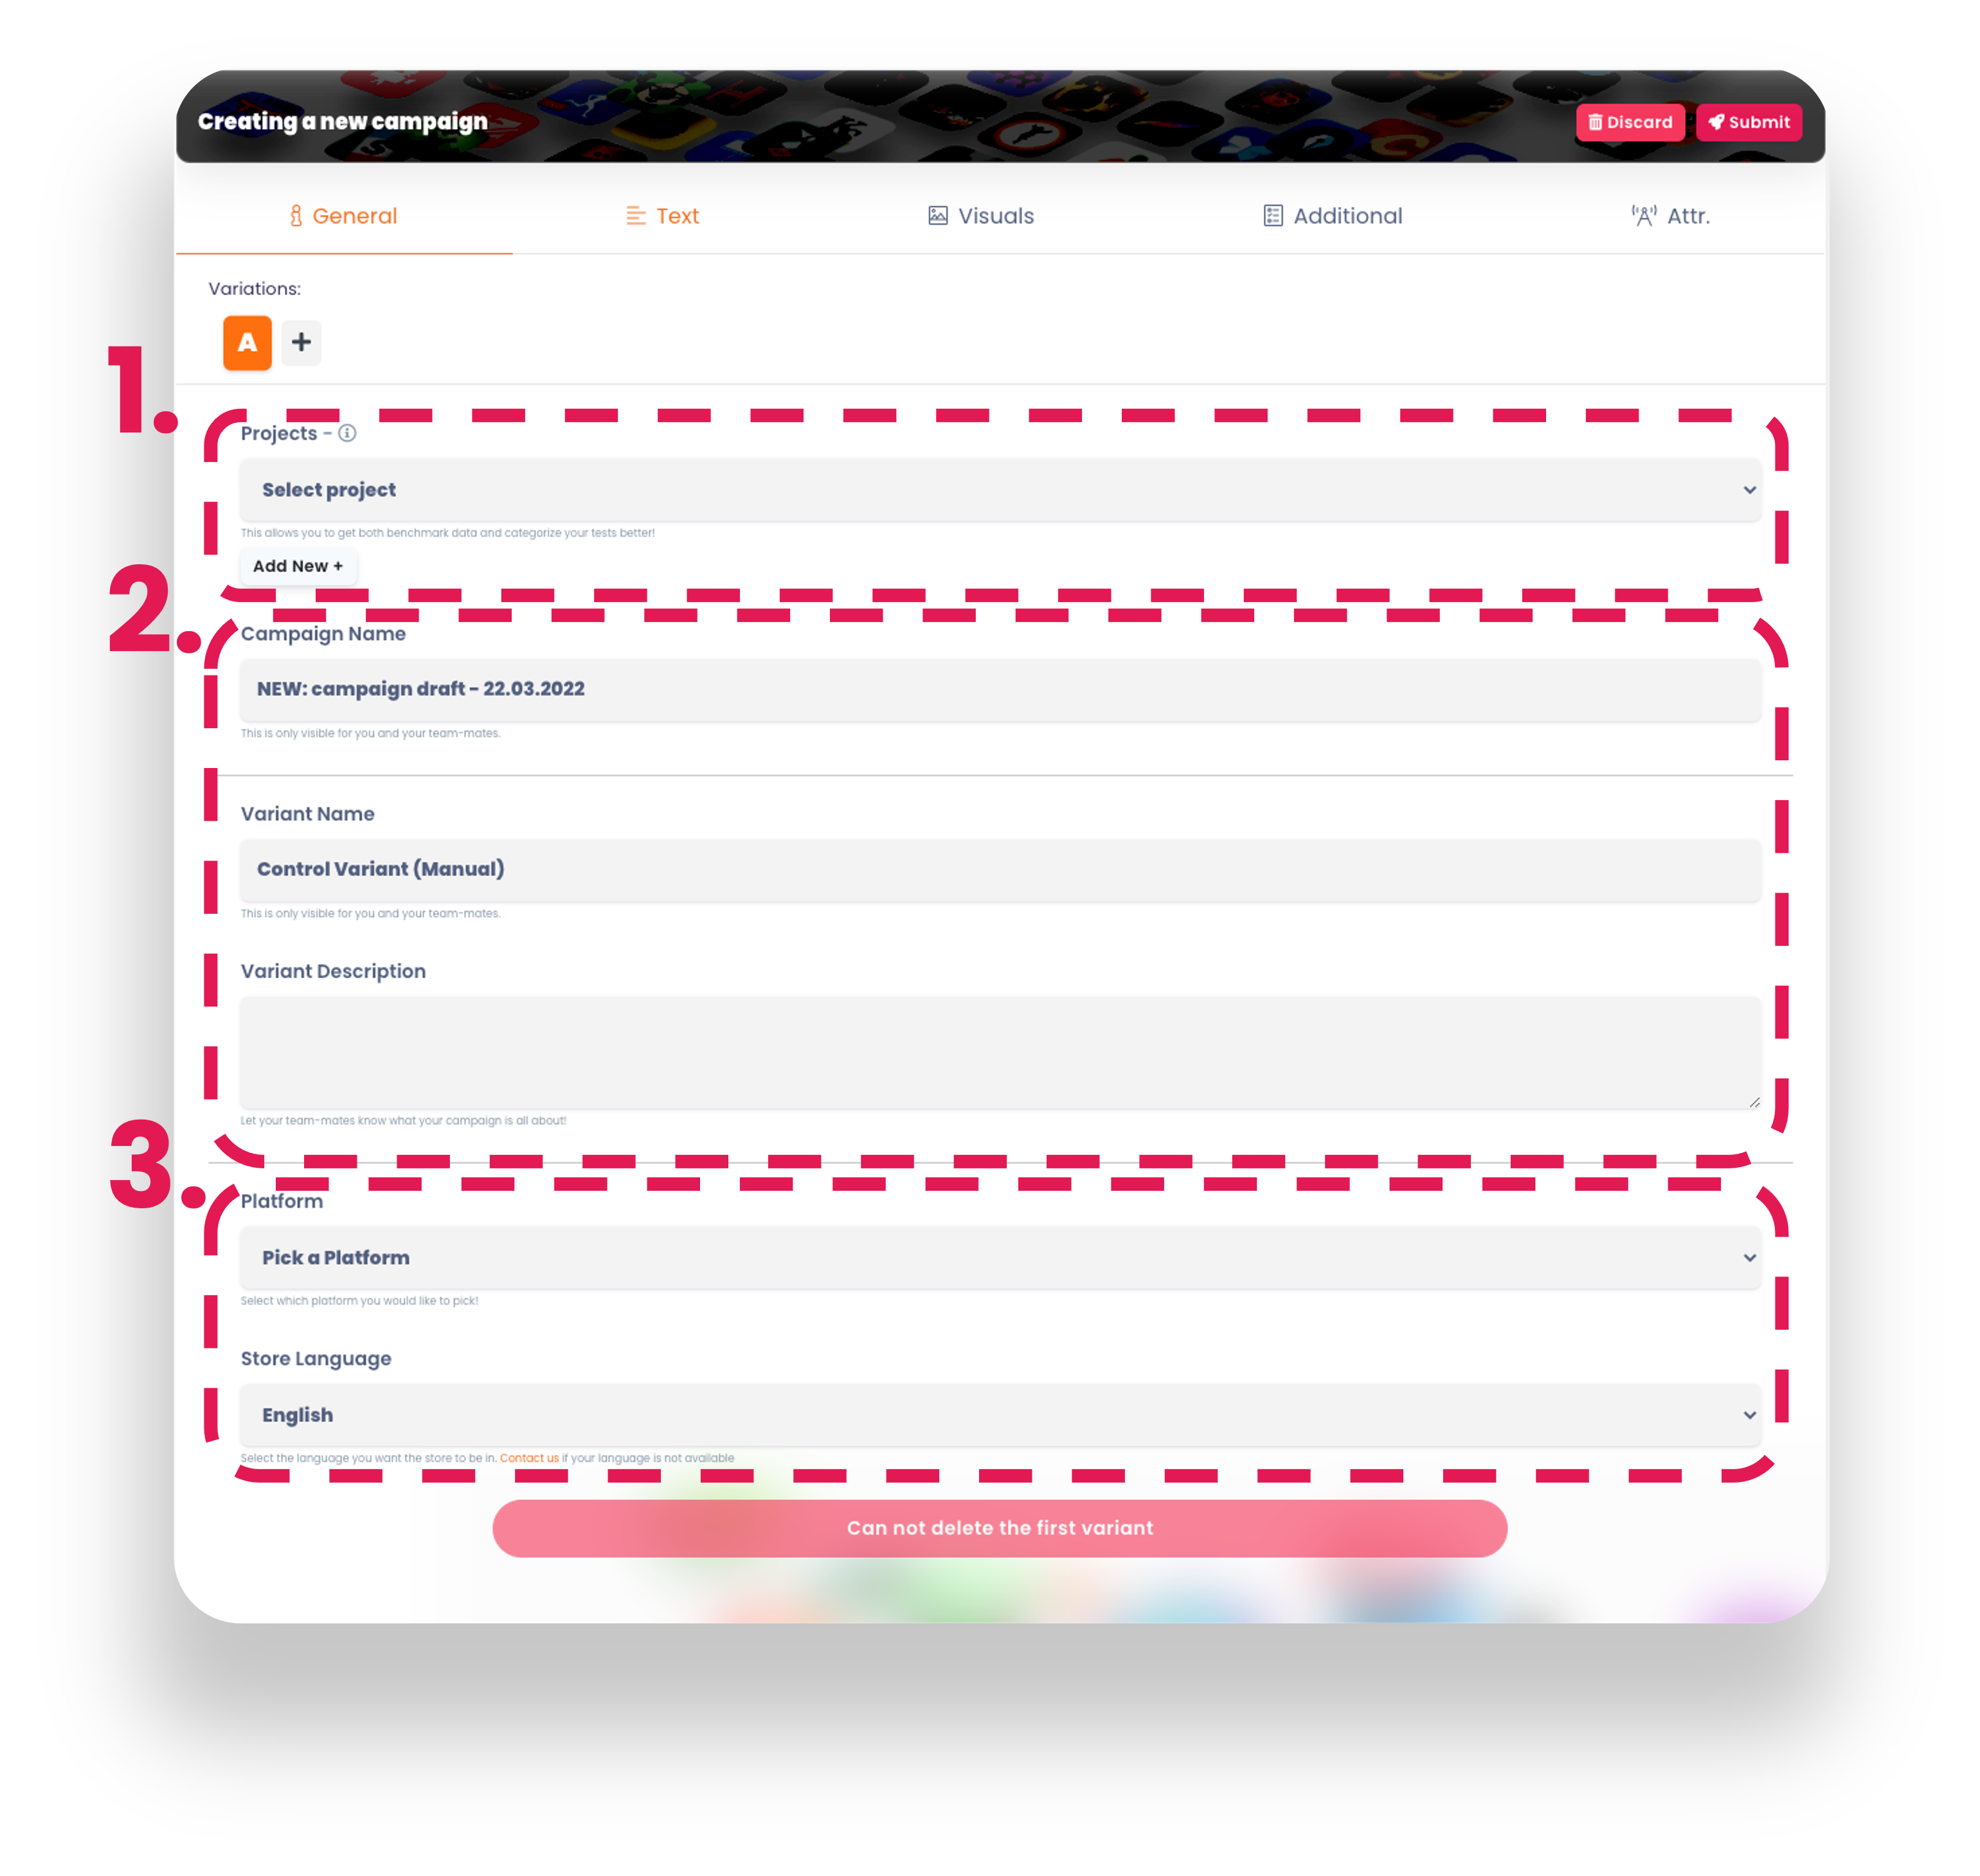
1. Let's create a project as this is our first campaign. This way, we'll be able to sign this campaign under a project.
Ex. you are creating a campaign to test different screenshots for Angry Birds 2, so you choose Angry Birds 2 as your project.
Projects include the game's icon, name, category, and subcategory. Don't worry if the game hasn't yet been released; the essential point is that your crew is aware of the project. Click the add new button to create a project.
2. Short name of the campaign like: ICON_TEST_IOS_FB . The goal here is to keep your team informed about what the test is all about, but also so that when you return to the test later, you don't have to spend extra energy trying to remember what the test was all about.
Variation name can also be anything that describes the variation.
Ex, control variant, Achievement & Action, Screenshots with video
If more information is required, you can describe the variation in Variant Description.
3. Lastly choose which app store to use and on what language. Note: While all the languages are supported, not all of them have been whitelisted yet. If you'd like to use one that isn't currently available, please contact us. We'll make it available within 24 hours.
TEXT:
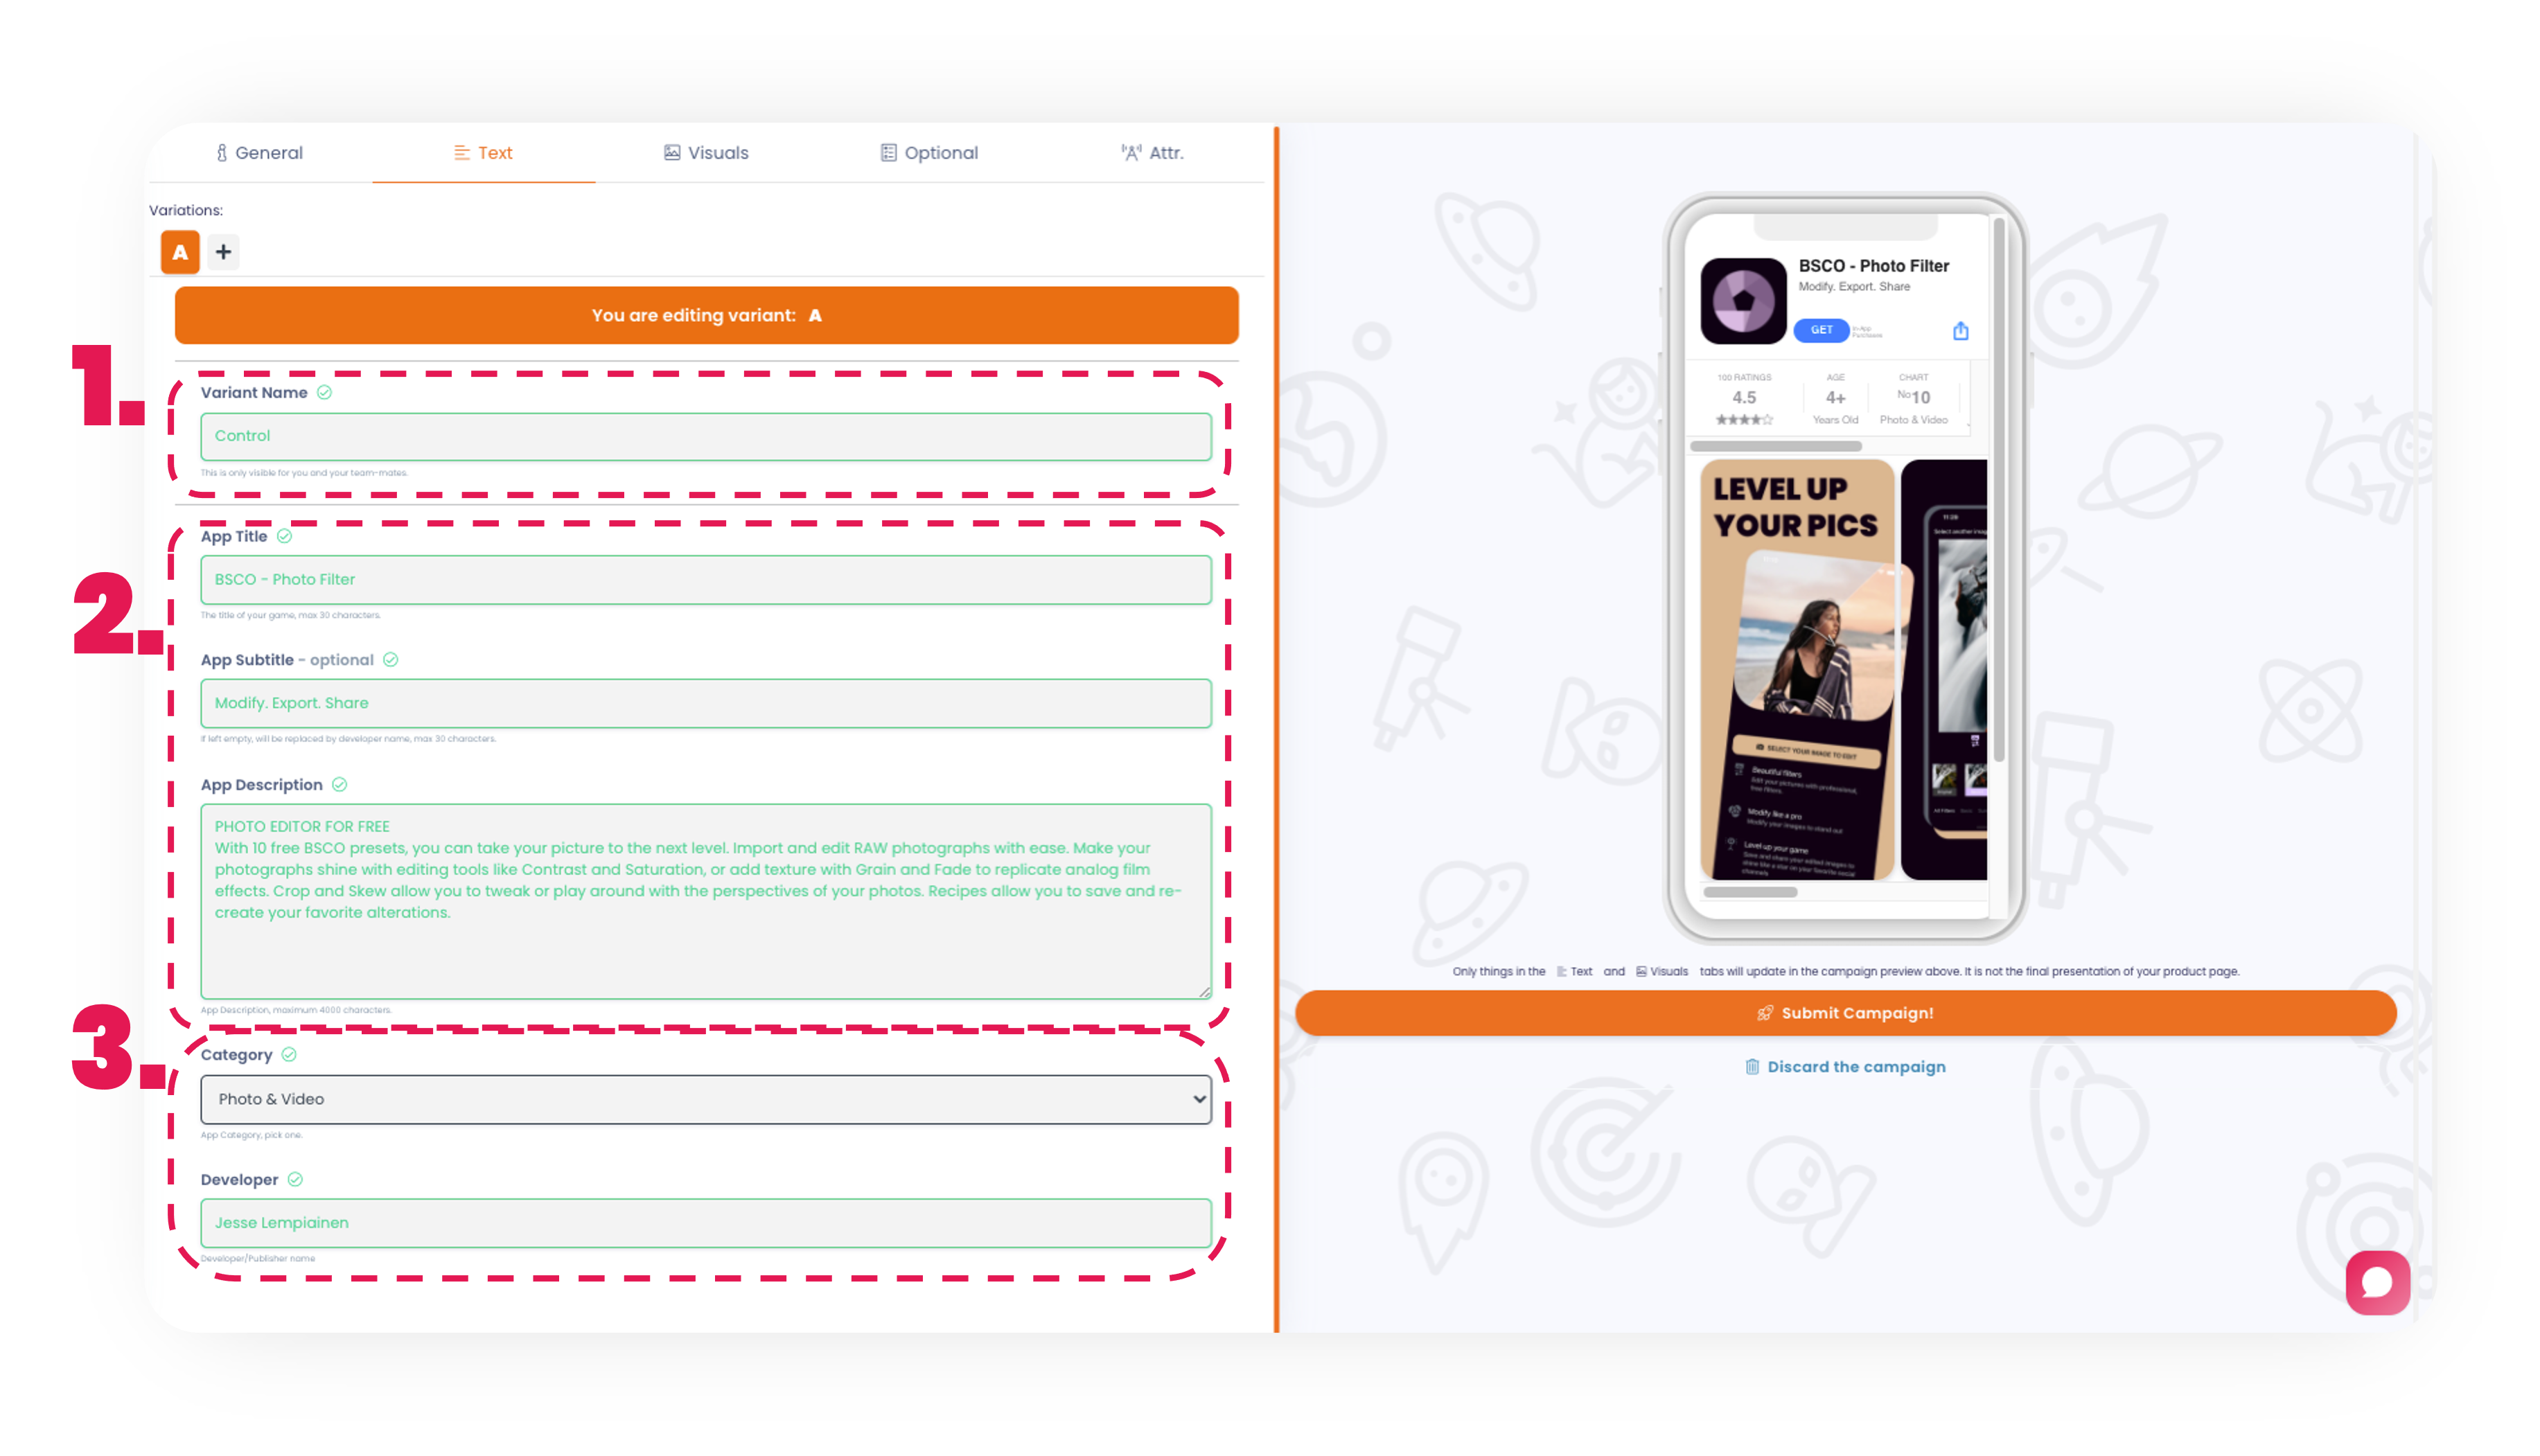
1. Name the first variation. Naming each variation so that all of your teammates understand what it represents. For example, if you have the actual store page and a few motivations to test, you can label the actual store page variation ‘Control' and others with motivations such as ‘achievement' and ‘competition.' (Only your team can see this.)
2. Add Title, Subtitle and app description for the app Notice: When fetching data from the store it will automatically fill the boxes with the text from the selected app store.
3. Categories have to be selected manually in any case. It will be visible in the look-a-like app page.
SIDENOTE: A campaign preview can be found on the right side of the campaign builder. It will show the changes made in the text and visual modules. It is not the final version of your product page.
VISUALS:
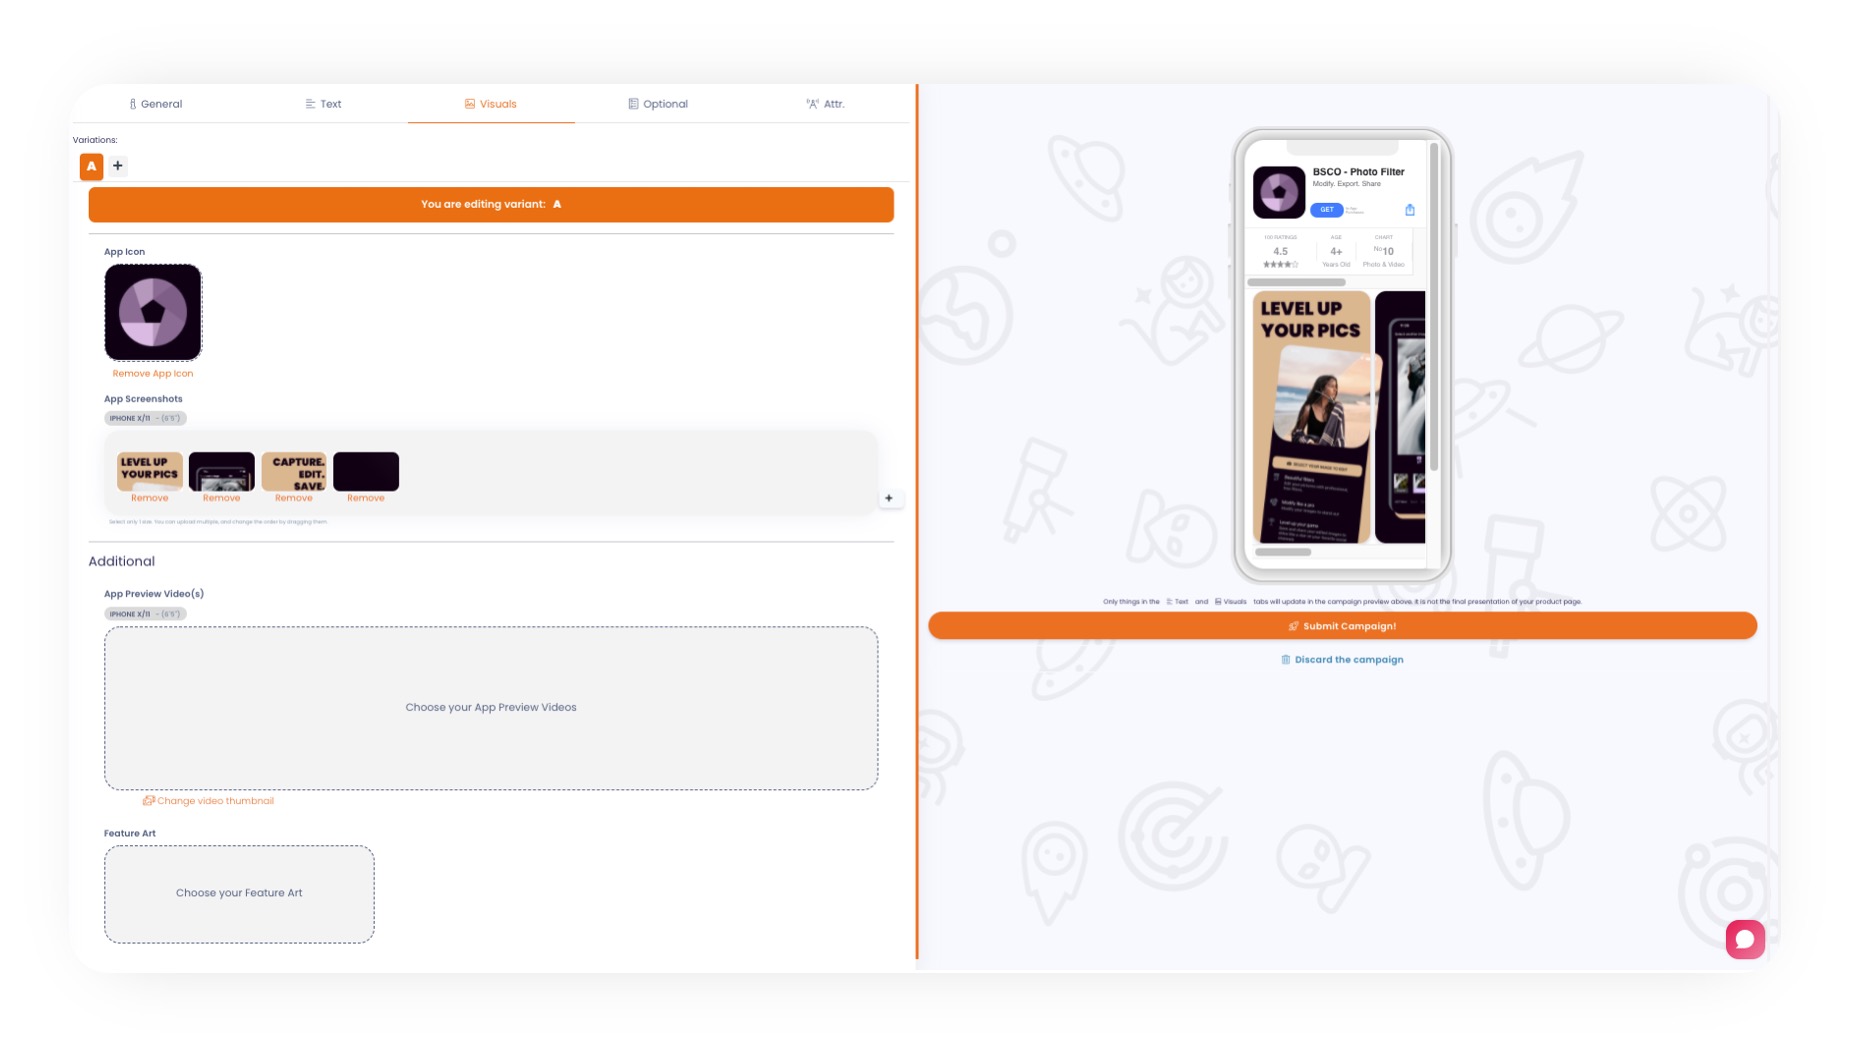
<span "="" 1rem;"="">Visuals can be easily dragged and dropped inside the white boxes. You may also drag and rearrange the order of the screenshots in the screenshots. Aspect ratios for the assets:
| iOS App Store | Google Play Store | |
| Icon | 1 : 1 | 1 : 1 |
| Screenshot | 2688 x 1242 or 1242 x 2688 |
Google allows you to use any sized visuals. To be eligible for recommendations in formats that use screenshots the resolutions must be 4 x 16: 9 or 9: 16 screenshots for apps & 3 x 16: 9 or 9: 16 screenshots for games. |
| Video | 2688 x 1242 or 1242 x 2688 | You can use any sized videos here. Note: In the actual Play Store, the video is linked through YouTube. Standard ratio for YouTube is 16: 9 or 9: 16. |
| Feature art | 4 : 1 | 4 : 1 Will be the thumbnail of the video |
ADDITIONAL:
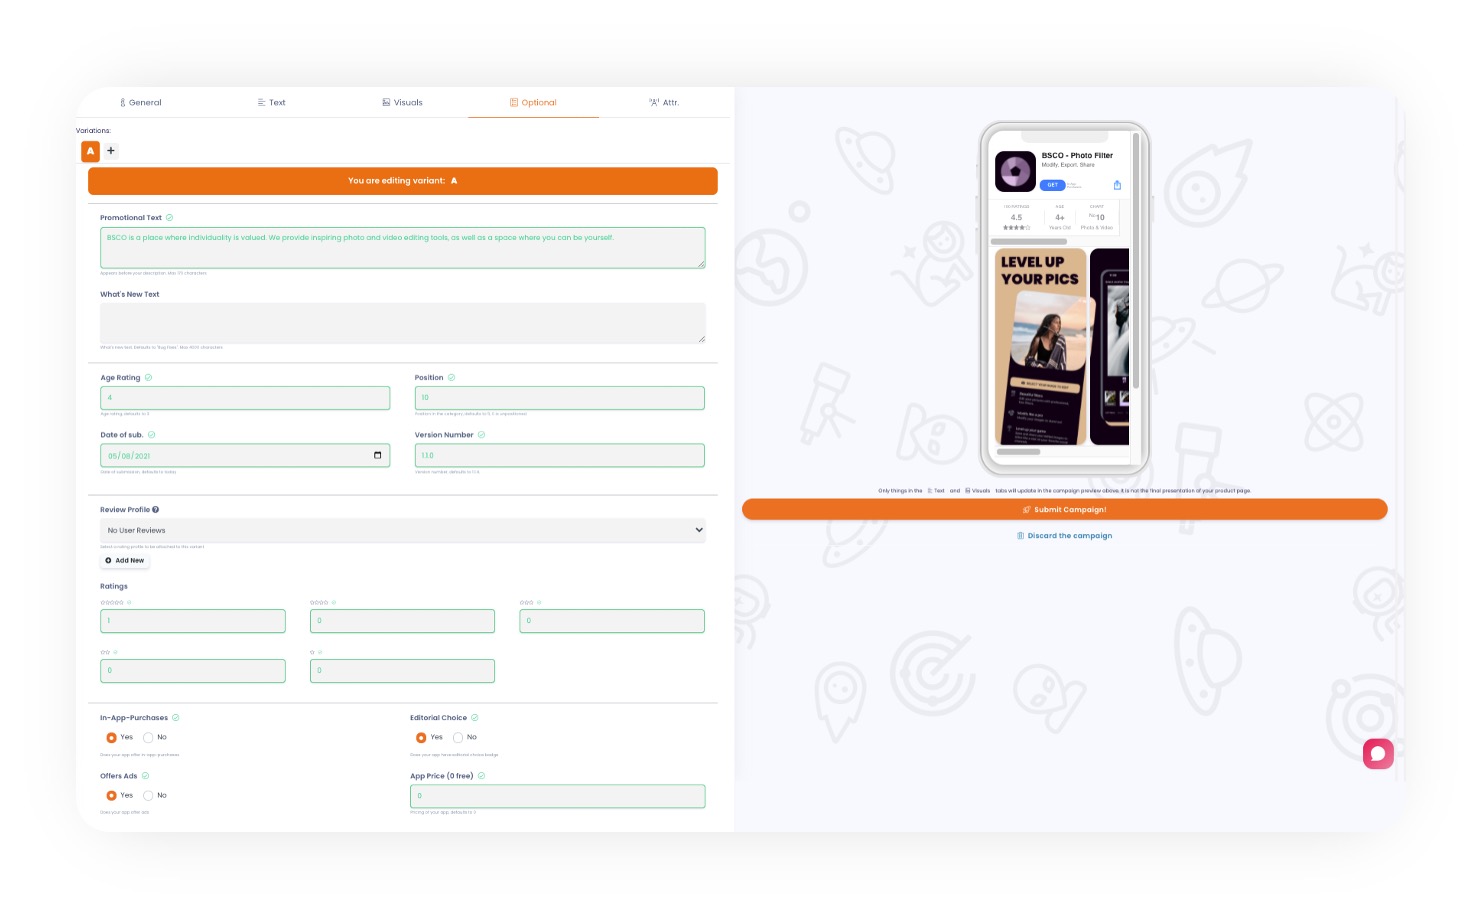
Smaller things like promotional text or reviews and ratings can be added or updated here. The age rating and privacy labels can also be updated and tested.
If you leave any of these blank, the default values will be used.
Review Profile: Allows you to add reviews to your look-alike store page. You can choose an existing template from the drop down, or create a new one from 'add new' button. You can either fetch the reviews from the actual store page or create reviews yourself.
To add more variations, simply click the '+' symbol. It will create a new variation using all of the previous variation's data. All you have to do now is change the variation's name and the needed changes for a/b test.
ATTR (attribution):
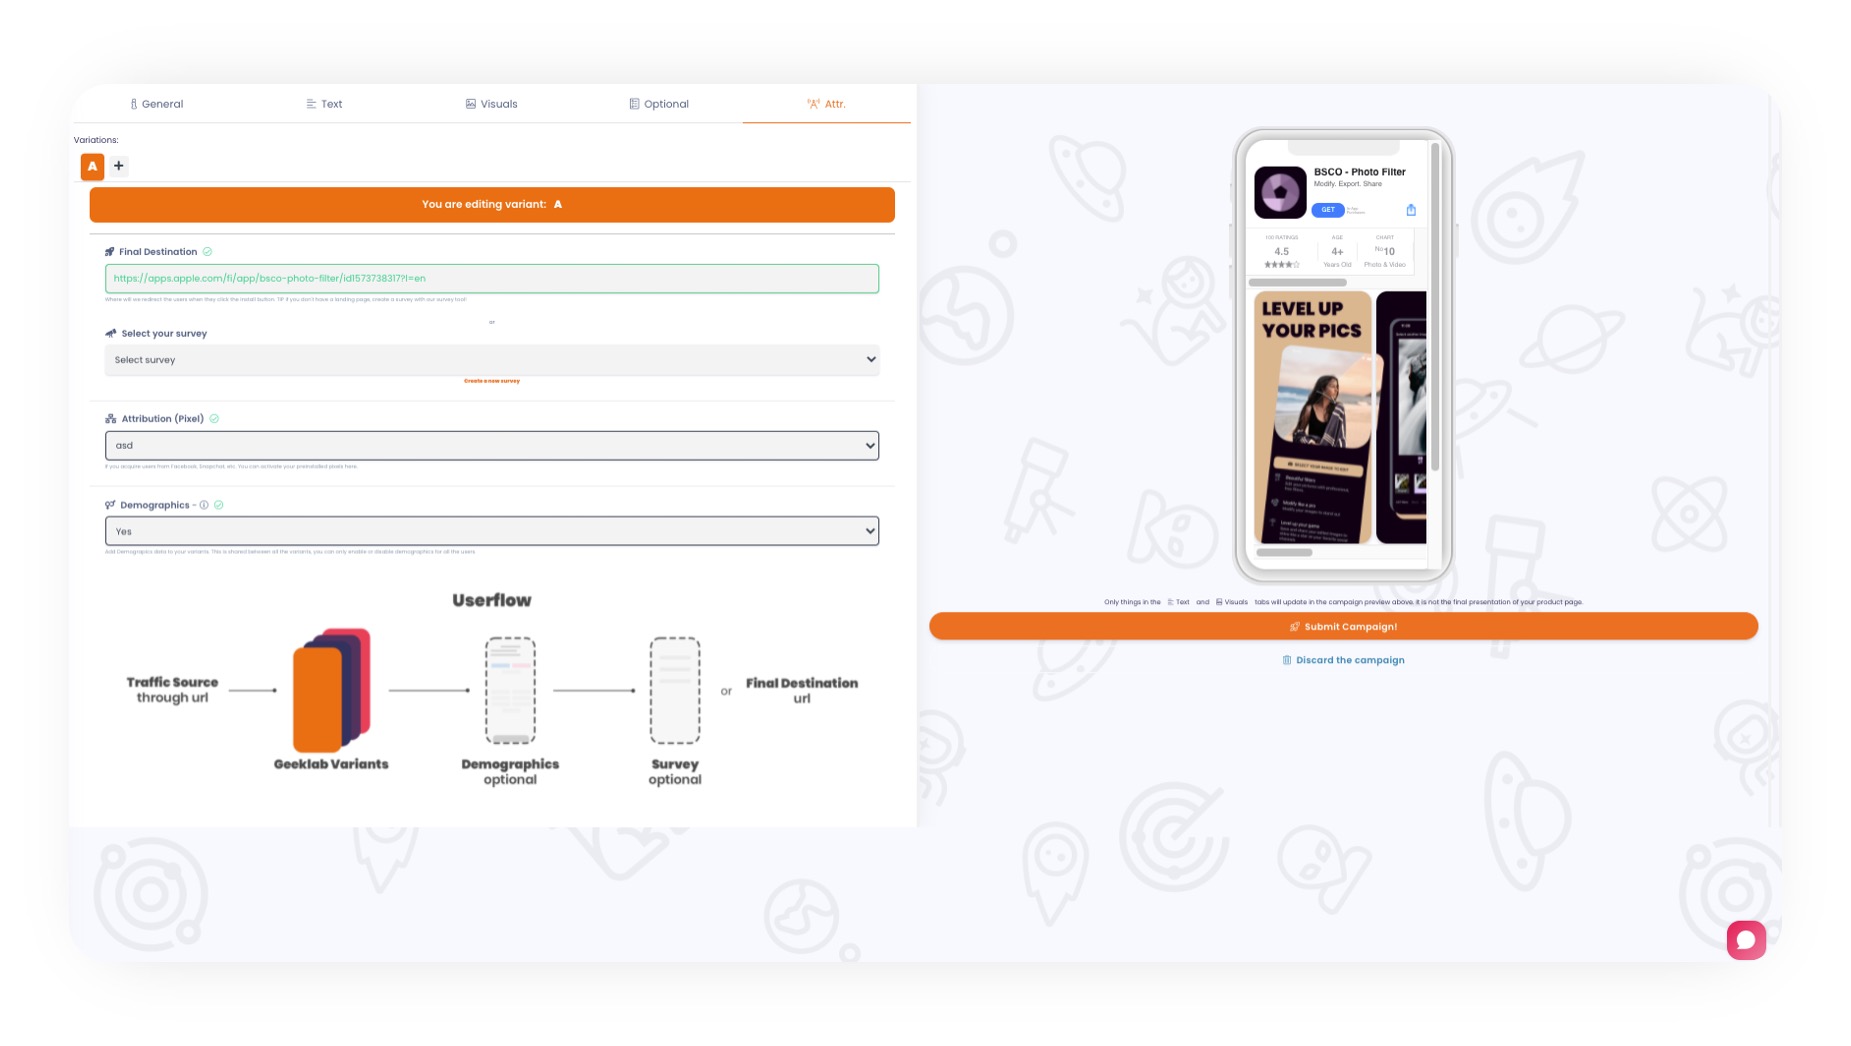
Navigate to variation A and then to 'ATTR' module. This way the changes will be automatically inserted to all the variations.
Final Destination = User that clicks the ‘get’ button will be directed to this URL. It can be the actual store page, but also link to let’s say Testflight or survey.
Survey = Geeklab includes a built-in survey tool, which can be accessed via the ‘create a new survey' link or the ‘SurveyLab' tab in the sidebar. You can either use an existing template or create one from scratch.
After the survey is ready you can find it from the ‘Select survey’ box.
NOTE: When selecting the survey, it will give a ‘/survey/qwertyqwerty/’ URL for the final destination. Don’t add Geeklab.app domain before the survey.
Attribution = While pixels are not required, we strongly recommend using them to make paid UA as efficient as possible. You can find a thorough guide on implementing Facebook pixel from this link : https://geeklab.app/posts/ios14-pixel .
Lastly you can add demographics data for your variants. Here is another blog post to help setting up the demographics: https://www.geeklab.app/posts/demographics .
Now, submitting the campaign will show you what the differences between the variations are, as well as whether you are missing any needed information. You will be unable to submit the campaign until all needed steps have been completed.
CONGRATULATION ON YOUR CAMPAIGN!!!!🚀🎉
After you submit the campaign, you will receive tracking links for the look-alike pages. The picture below depicts the expanded outlook of a campaign in the 'Campaign & Variations' sidetab.
1. The campaign tracking link is located next to the campaign name. With the campaign tracking link, all traffic will be divided at random between the variations.
Example: You're testing icons and want to direct users to look-alike pages from the same ad. So you can use a single link (campaign tracking link) to automatically redirect users to the variations at random.
2. Tracking links for each variation are available in the extended view. After each variation name, you'll find a tracking link that will take users to that specific variation.
Example: You're testing different concepts and you'll have different ads for each variation. You would use the corresponding tracking link with the corresponding ad in this case.